TradingView is one of the best Charting platforms, providing multiple built-in trading indicators and tools to make decisions and increase the chances of booking profits.
This platform also offers customized trading indicators that help traders plan their strategy. However, creating these custom indicators may seem a little challenging for beginners. In this blog, we’ve discussed a step-by-step process for creating and backtesting custom indicators on TradingView. Let’s begin with the steps!
How Do You Create a Custom Indicator on a TradingView?
Here are four simple steps to build a custom indicator as per your needs and preferences:
Step 1: Opt for the Right Type of Indicator
Creating a custom indicator in TradingView primarily requires you to opt for the right type of indicator from a list of multiple indicators, including moving averages, oscillators, trend indicators, etc.
Moving average indicators help identify trends and support and resistance levels. Oscillators help in determining the overbought and oversold conditions.
You have to choose the indicator based on your trading goals. For instance, if your main purpose is to identify the direction of trends, you should choose a trend indicator.
You should also consider the market conditions and the trading strategy while creating your custom indicator.
Step 2: Define Input and Settings
Input and Settings allow you to tailor the behavior of your indicator and increase its usefulness as per your specific requirements.
The input section allows you to define the parameters of your indicator, including the overbought/oversold levels for oscillators and the length of the moving average.
The Settings section allows you to define the visual appearance and values for your inputs, including the color and style of indicator lines and the type of chart on which an indicator will be displayed.
Step 3: Write Code for Indicator
In the process of creating a custom indicator, the main step is to write a code for the indicator using the Pine Script language. You write the code in the output section and use a variety of Pine script functions to perform calculations like oscillators, trend indicators, moving averages, and more.
Codes can also be used to craft the color and style of the indicator lines and set alert conditions. You must have a comprehensive understanding of Pine Script Language and related functions to write effective codes for your custom indicator. You may refer to TradingView’s on-demand resources.
Step 4: Add Comments and Documentation
Lastly, you need to add comments and documentation to your custom indicators in order to make the codes more readable, understandable, and maintainable.
Comments are typically the lines of text to add near your code to briefly explain its work. You can also use them to explain a specific section of code. This is just for your understanding, completely ignored by the compiler, and doesn’t affect your indicator’s functionalities.
Documentation is an extensive form of commenting, generally added to the top of the script. It provides some other information regarding the indicator, including inputs, settings, how it works, how to use it, and how you can even interpret the results.
With this step, you finally complete the process of creating a custom indication with TradingView.
How to Backtest Custom Indicators on TradingView?
Here are six simple and straightforward steps to backtest your custom indicators on TradingView.
Step 1: Open the Chart
First, you must visit the TradingView platform and open the chart of the underlying financial instrument you want to backtest.

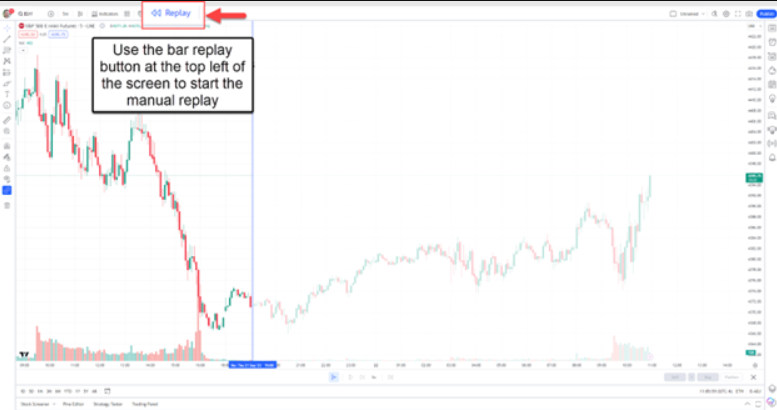
Step 2: Bar Replay Tool
Click on the “Bar Replay” icon located at the top-flight side of the chart.
Step 3: Set Up Start Point
Take your cursor to the point from where you want to start your backtest. Now, click the button to set the starting point.

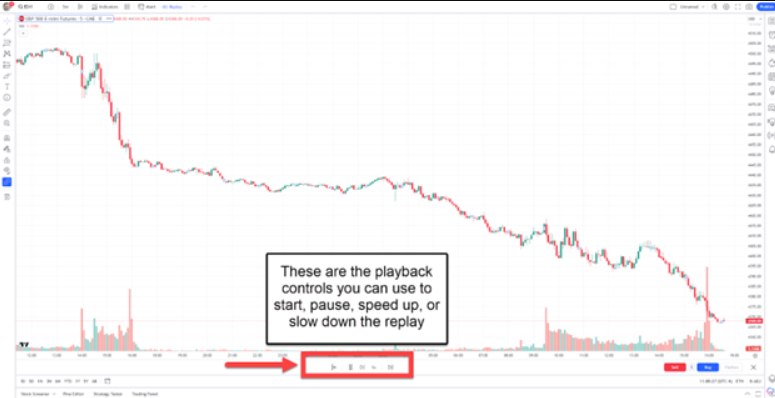
Step 4: Playback Control
At this step, you need to properly utilize play, forward, or reverse buttons to go through the price data one bar at a time.
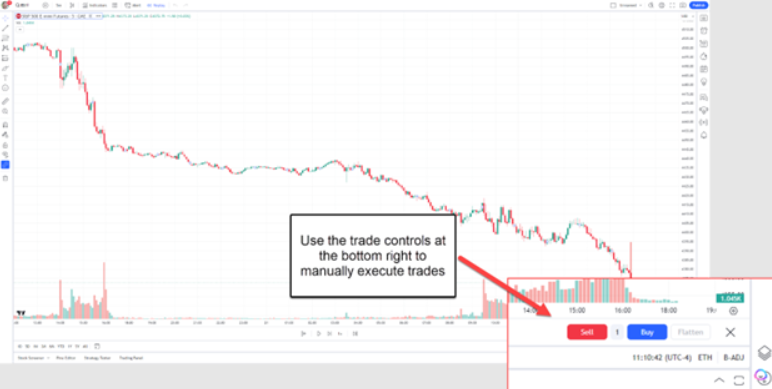
Step 5: Execute Trades Manually
While going through data, use your strategy to make your trade entries and exits.
Step 6: Document Results
You must record all your trading outcomes like stop-loss, entry and exit price, take-profit levels, and a lot more.
Conclusion
Using customized trading indicators can be helpful in making informed trading decisions. We hope this guide helps you to create and backtest a customized indicator. To use TradingView for free, consider Dhan. It has integration with TradingView and allows you to access the platform without any additional cost.
Read More